Tutorials

How to use PulseRecorder

Eight short guides, from your first recording to sharing it. Each one takes a minute or two to follow.

Prefer to click around? Try the live demoarrow_forward

  1. 1Open the recorder
  2. 2Record your screen
  3. 3Add sound and your voice
  4. 4Shortcuts and pausing
  5. 5Find your recordings
  6. 6Trim and export
  7. 7Share
  8. 8Settings and plans
1

Open the recorder

PulseRecorder lives in a panel on the right side of Chrome, so it stays open while you browse.

  1. Click the puzzle piece in Chrome’s toolbar, then the pin next to PulseRecorder. The red icon now stays in the toolbar.
  2. Click the red icon. The panel opens on the right.
  3. Use the menu at the bottom to move around: Record, Library, Settings and Help.

No account is needed. The Free plan works as soon as the extension is installed.
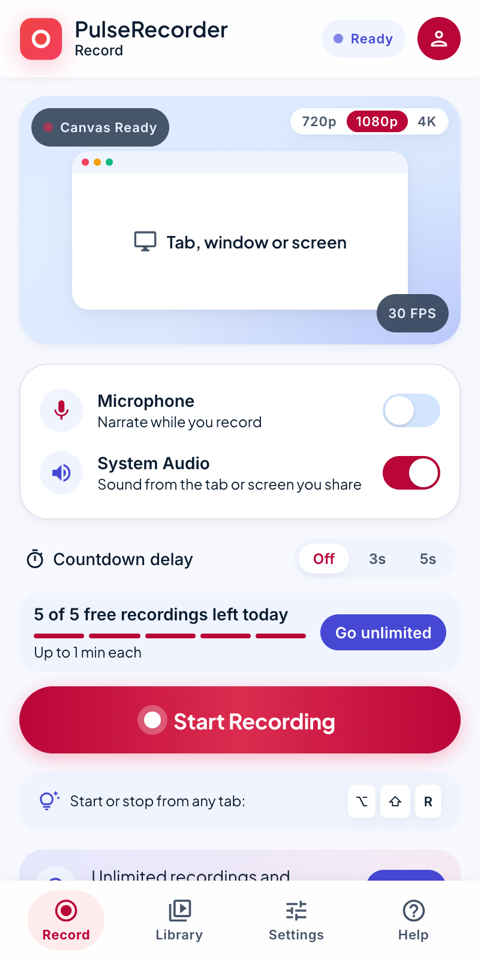
The Record screen: preview, audio switches, countdown and the Start Recording button
The Record screen
2

Record a tab, a window or your whole screen

You choose what to record in Chrome’s own picker, after pressing Start.

  1. On Record, pick the size at the top of the preview: 720p, 1080p or 4K.
  2. Optional: set a Countdown delay of 3 or 5 seconds to get ready before recording begins.
  3. Press Start Recording.
  4. In Chrome’s picker, choose a tab, a window or the entire screen, then click Share.
  5. Do what you want to show. The panel shows the time and a REC badge while recording.
  6. Press Stop in the panel, or click Stop sharing in Chrome’s bar. The panel shows Recording saved; open the recording to trim, export or share it.

Resizing the recorded window while recording is fine: the video keeps its size and the picture is fitted inside it.

3

Add sound and your voice

Two switches on the Record screen decide what is heard in the video.

  1. Turn on System Audio to record the sound of the tab or screen you share.
  2. In Chrome’s picker, tick Share audio (for a tab: “Also share tab audio”). Without that tick, Chrome sends no sound.
  3. Turn on Microphone to narrate. The first time, a tab opens asking for microphone access: click Allow, then return to the panel.
  4. Start recording. Your voice and the tab’s sound are mixed into one track.

The microphone is used only while a recording is running, and only if its switch is on.

4

Keyboard shortcuts and pausing

Shortcuts work from any tab, even when the panel is closed.

  1. Press Alt Shift R to start or stop a recording (⌥ ⇧ R on a Mac).
  2. Press Alt Shift P to pause, and again to resume. Paused time is left out of the video.
  3. To change the keys, open chrome://extensions/shortcuts in Chrome.

Pausing is part of Pro. The start and stop shortcut works on every plan.

5

Find, rename and delete recordings

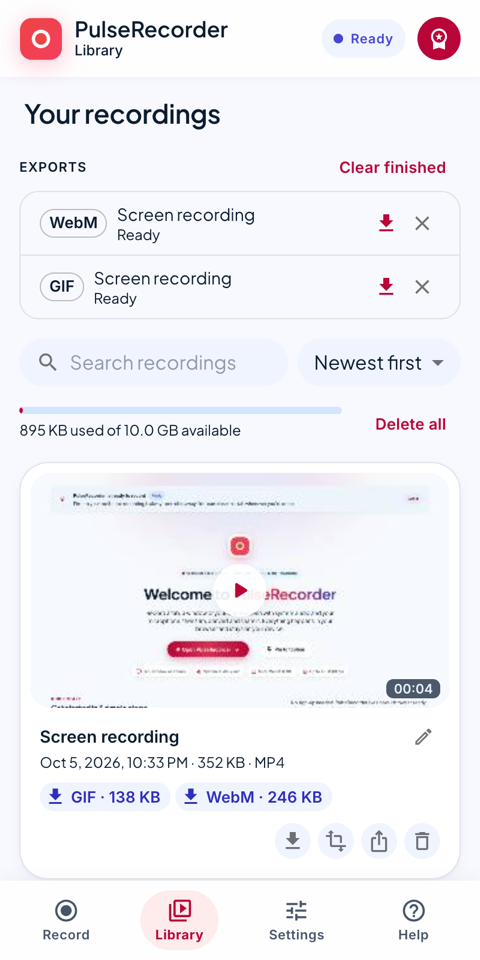
Every recording is kept in your browser, in the Library, until you delete it.

  1. Open Library from the bottom menu.
  2. Use Search recordings or the sort menu to find one. Click its picture to open it in Share & Export, where you can play it.
  3. Click the pencil next to the title to rename it. The name is used for the downloaded file.
  4. Use the buttons under a recording to download it, export it in another format, share it or delete it.
  5. The bar above the list shows how much space your recordings use. Delete all clears the Library.

Recordings are removed automatically after the time set in Settings → General → “Keep recordings for”. Download the ones you want to keep.

The Library screen: exports list, search box, storage bar and a recording card with its buttons
The Library, with a recording of the welcome page
6

Trim and export to MP4, GIF or WebM

Share & Export opens when you click a recording, on the Record screen or in the Library.

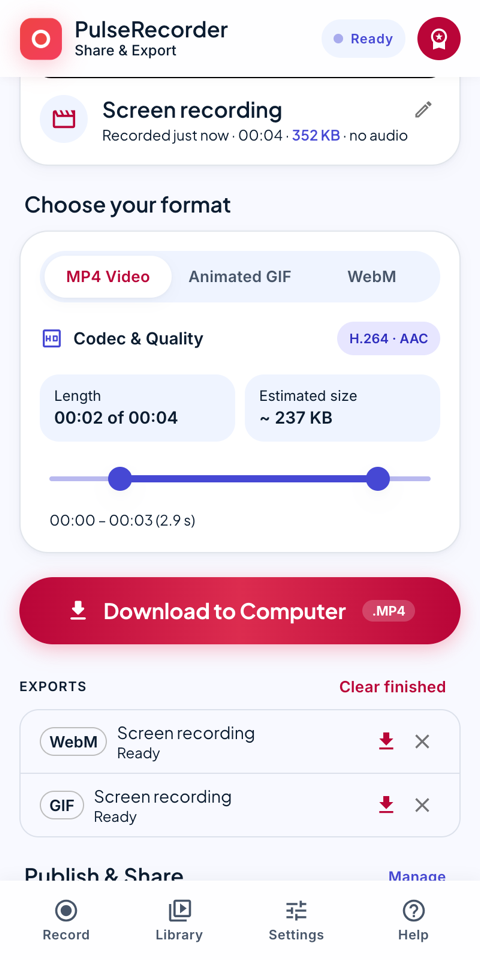
  1. Open a recording and click the scissors at the top right. A bar with two dots appears under the format choice.
  2. Drag the left dot to where the clip should begin and the right dot to where it should end. The line under the bar shows the new start, end and length.
  3. Under Choose your format, pick MP4 Video, Animated GIF or WebM. The card shows the length and the estimated size.
  4. Press Download to Computer. If the format needs converting, it is done on your computer and the file downloads when ready.
  5. Finished conversions are listed under Exports in the Library, where you can download them again.

MP4 plays almost everywhere. GIF suits short clips for chats, documents and issue trackers; its frame rate and width are set in Settings → Export.

Share and Export with MP4 chosen and the trim bar open: two dots mark the start and end, and the length reads 2 of 4 seconds
The format choice with the trim bar open
7

Share to Drive, X, YouTube, Gmail and more

Share shortcuts open the site and add your file for you. You confirm on the site itself.

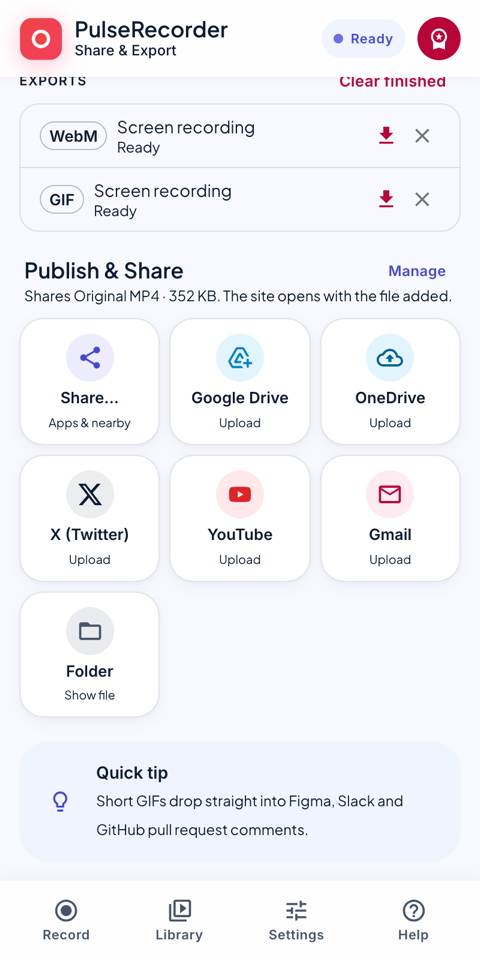
  1. In Share & Export, scroll down past the download button to Publish & Share.
  2. Click a site: Google Drive, OneDrive, X, YouTube or Gmail.
  3. The first time for each site, Chrome asks whether PulseRecorder may act on that site. Click Allow.
  4. The site opens in a new tab with your file already added. Write your caption or message and press the site’s own Post, Upload or Send button.
  5. For apps on your computer, choose Share… instead. It opens your computer’s share menu (AirDrop, Mail, Messages, WhatsApp and other installed apps).
  6. Folder downloads the file and shows it in your Downloads folder.

A site is greyed out when it can’t take the file, for example X does not accept WebM: export as MP4 first. If you don’t allow a site, the file is downloaded and selected in your Downloads folder so you can drag it in.

Sharing is part of Pro. On the Free plan you can download every recording.

The Publish and Share section: buttons for Share, Google Drive, OneDrive, X, YouTube, Gmail and Folder
The share buttons, under Publish & Share
8

Settings worth knowing, and what each plan includes

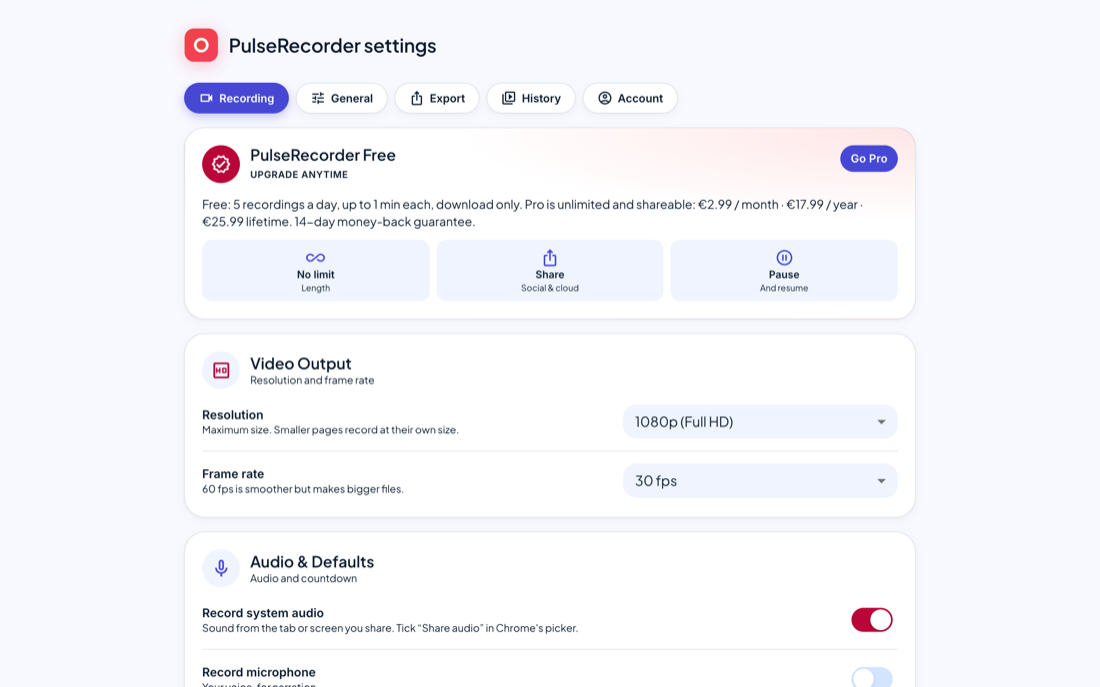
Open Settings from the bottom menu. These are its main tabs.

  1. Recording: the largest picture size, the frame rate (60 fps is smoother but makes bigger files), and whether sound, microphone and countdown start switched on.
  2. General: the red dot on the toolbar icon while recording, and how long recordings are kept.
  3. Export: the default format, GIF quality, the file name pattern (it can include the date, time and title), and which share shortcuts are shown.
  4. Account: your plan, upgrading, logging in on another computer after paying, and the refund request link.
IncludedFreePro
Recordings per day5Unlimited
Length of each recordingUp to 1 minuteUnlimited
Download as MP4, GIF or WebMYesYes
Pause and resumeNoYes
Share shortcuts and the share menuNoYes
Keep recordingsUp to 7 daysAs long as you like

Pro has a free 7-day trial and a 14-day money-back period. Start either from Settings → Account.

The Settings page on its Recording tab: plan summary, resolution and frame rate, audio defaults
Settings, on the Recording tab

Still stuck?

Tell us what you were trying to do and we’ll help. The same links are in the extension, under Help.